Managing and configuring a router can be a challenging task, especially for beginners. In this article, we will take a detailed look at how to setup your router via console, SSH, and web interface. You will learn how to properly configure interfaces, assign IP addresses, change passwords, and reset to factory settings. We also provide step-by-step instructions and helpful screenshots to guide you through the process quickly and easily.
Control in console
Operating the server is available via 
Configuration
Interfaces
After logging into the router interface, you will immediately see the IP address assigned to the WAN port. Once the ports are reassigned, the IP address of the LAN port will also be available.

The first step in configuring the router through the console is to assign the interfaces.
In the menu, select option 1) Assign interfaces.
Decline the configuration of port aggregation and VLAN creation:
			 Do you want to configure LAGGs now? [y/N]: n

			 Do you want to configure VLANs now? [y/N]: n
You will see the available ports with their MAC addresses. We recommend verifying the MAC addresses of the WAN and LAN ports in your personal account.
			 vtnet0           fa:16:3e:91:a3:56 VirtIO Networking Adapter

			 vtnet1           fa:16:3e:86:33:3f VirtIO Networking Adapter
Next, specify their correspondence:
			 Enter the WAN interface name or 'a' for auto-detection: vtnet0


			 Enter the LAN interface name or 'a' for auto-detection (or nothing if finished): vtnet1
Press Enter to continue:
			 Enter the Optional interface 1 name or 'a' for auto-detection

			 (or nothing if finished):
Press y to confirm the completion of port assignment.
See all the listed commands highlighted on the screenshot below:

Internet access is configured, and LAN devices connected to your private LAN network will also have internet access (from the router's default private subnet 192.168.1.1/24).

Assigning IP addresses
If you need to manually configure IP settings, select option 2) Set interface IP addresses.
Next, choose to configure the LAN or WAN network by selecting 1 or 2 respectively.
In this example, we will configure the LAN subnet 192.168.8.1:
Select 1 to configure the LAN network:
Enter the number of the interface to configure: 1
Decline automatic configuration:
Configure IPv4 address LAN interface via DHCP? [y/N] n
Specify the IP address:
			 Enter the new LAN IPv4 address. Press <ENTER> for none:

			 192.168.8.1
Subnet /24:
			 Enter the new LAN IPv4 subnet bit count (1 to 32):

			 24
Press Enter, as specifying a gateway for the LAN network is not necessary:
			 For a WAN, enter the new LAN IPv4 upstream gateway address.

			 For a LAN, press <ENTER> for none:
Decline the IPv6 configuration for the LAN network:
			 Configure IPv6 address LAN interface via WAN tracking? [Y/n] n

			 Configure IPv6 address LAN interface via DHCP6? [y/N] n
Enable the DHCP server for your local devices and specify the start and end addresses of your pool:
			 Do you want to enable the DHCP server on LAN? [y/N] y


			 Enter the start address of the IPv4 client address range: 192.168.8.10

			 Enter the end address of the IPv4 client address range: 192.168.8.250
Decline the following three options:
			 Do you want to change the web GUI protocol from HTTPS to HTTP? [y/N] n

			 Do you want to generate a new self-signed web GUI certificate? [y/N] n

			 Restore web GUI access defaults? [y/N] n
See the full list of the used commands on the screenshot below:

Commands for configuring DHCP for the WAN network:

Configuring IP addresses is complete.
In the menu, select option 8) Shell to enter terminal mode, and use the command ifconfig to see the assigned IP addresses.

Check the ping to Google by domain name over IPv4 address using the command ping -4 google.com
Changing the Password
Here is how you can change the password for the root user in the console:
- Select option 3) Reset the root password and press y to confirm.
- Enter the new password and confirm again.

Factory Reset
To reset to factory settings, select option 4) Reset to factory defaults from the menu. After resetting the settings, you will need to manually power on the router through the control panel in your personal account.
Using web interface
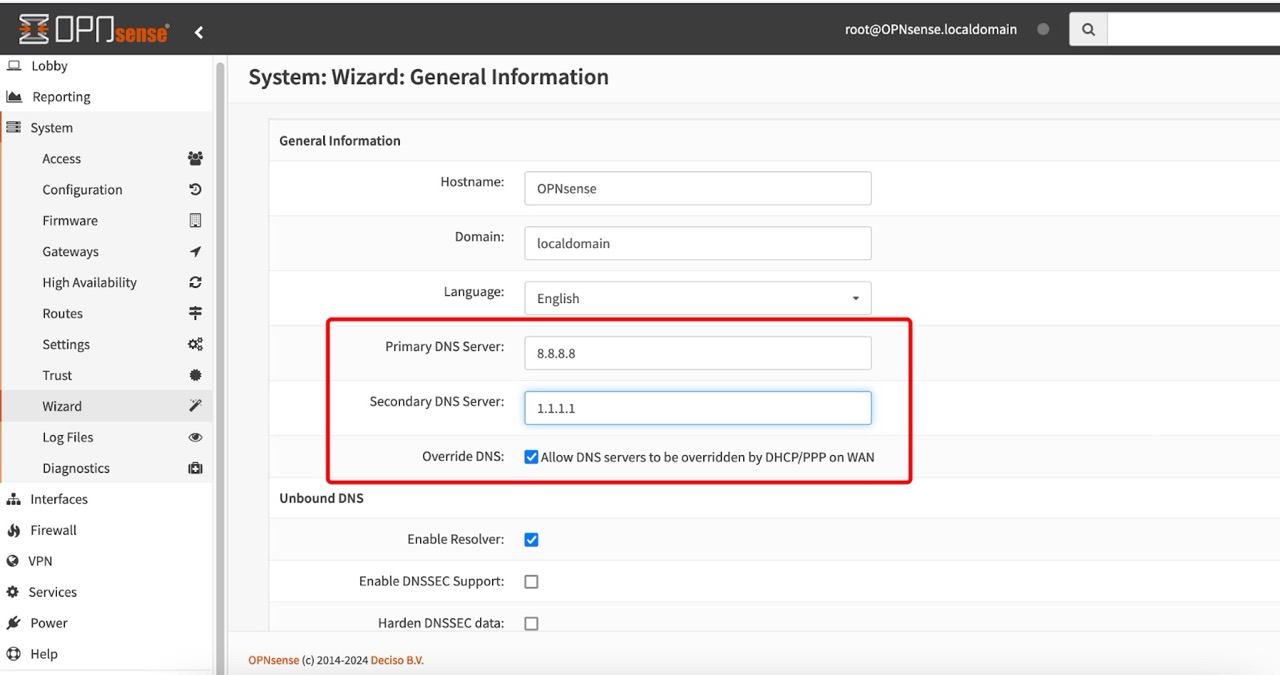
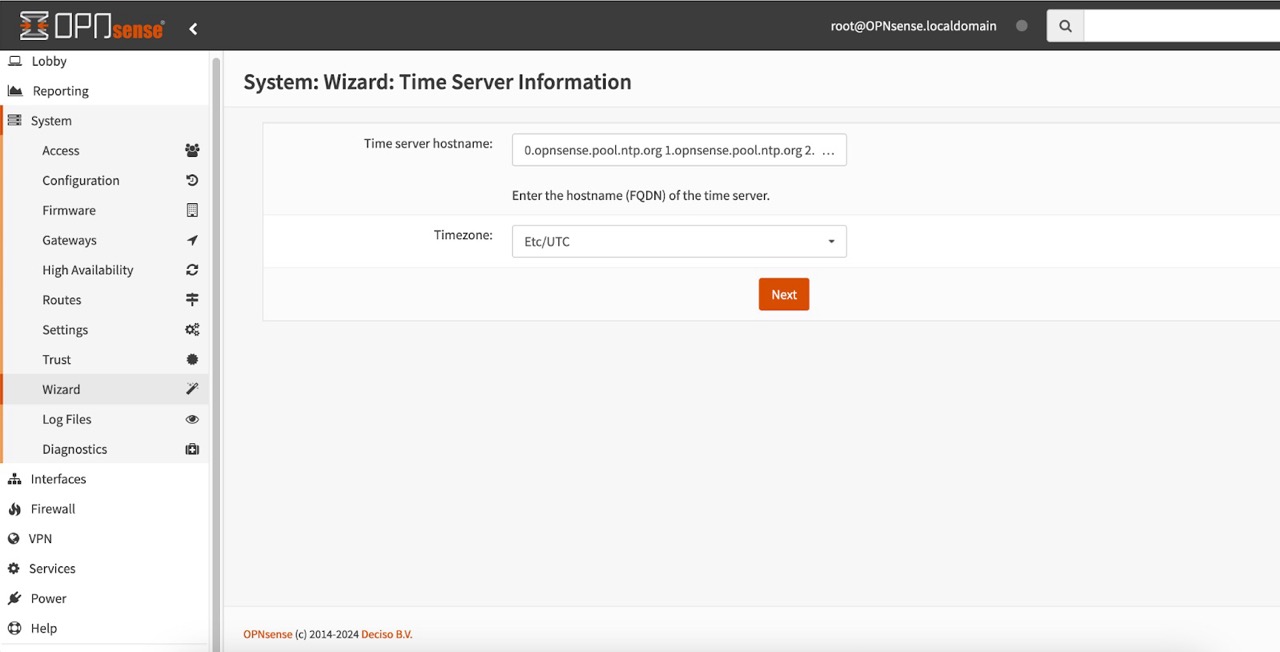
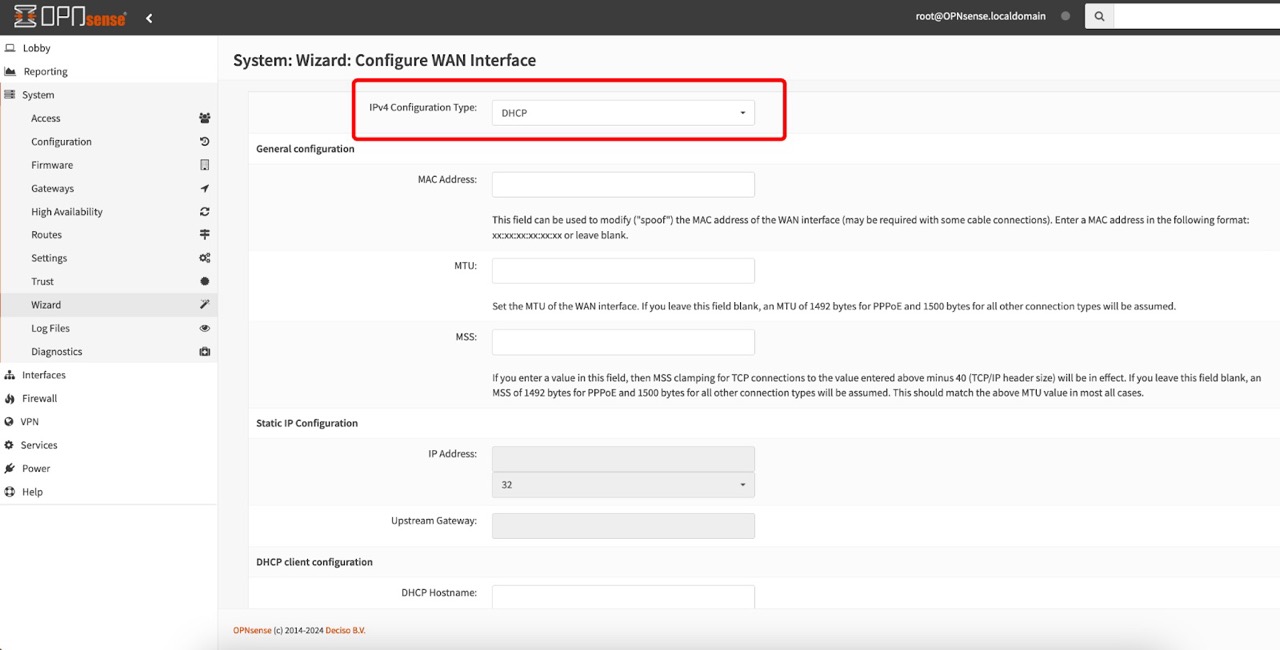
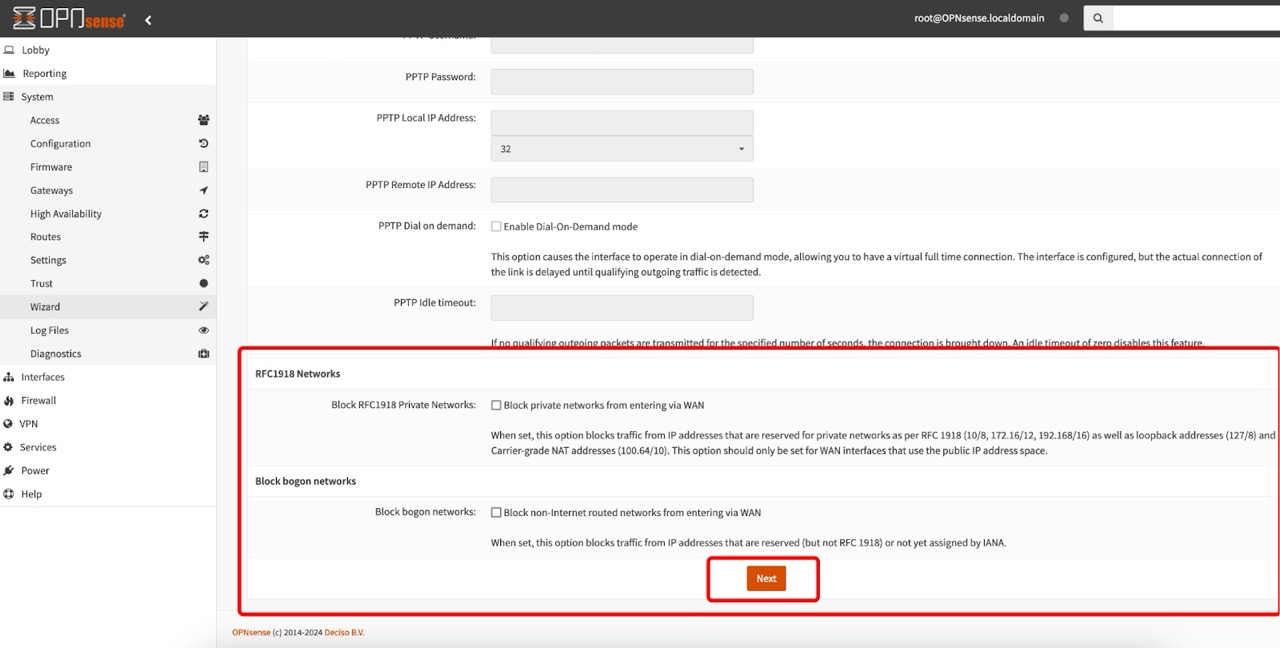
To quickly configure the system, use the configuration wizard. There you can specify the system language, WAN and LAN interface settings, set the DNS server address, time zone, and change the administrator password (root user).

Configure the basic settings as shown in the screenshots below:
Step 1
Step 2
Step 3
Step 4
Step 5
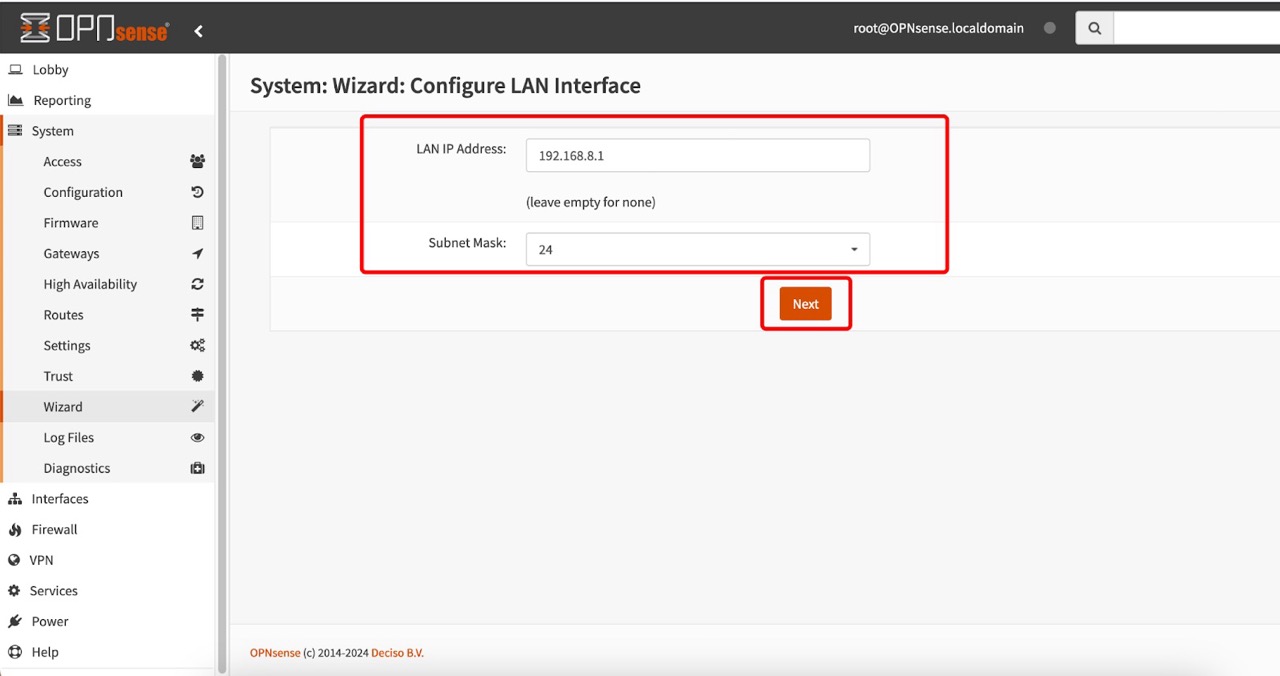
Step 6
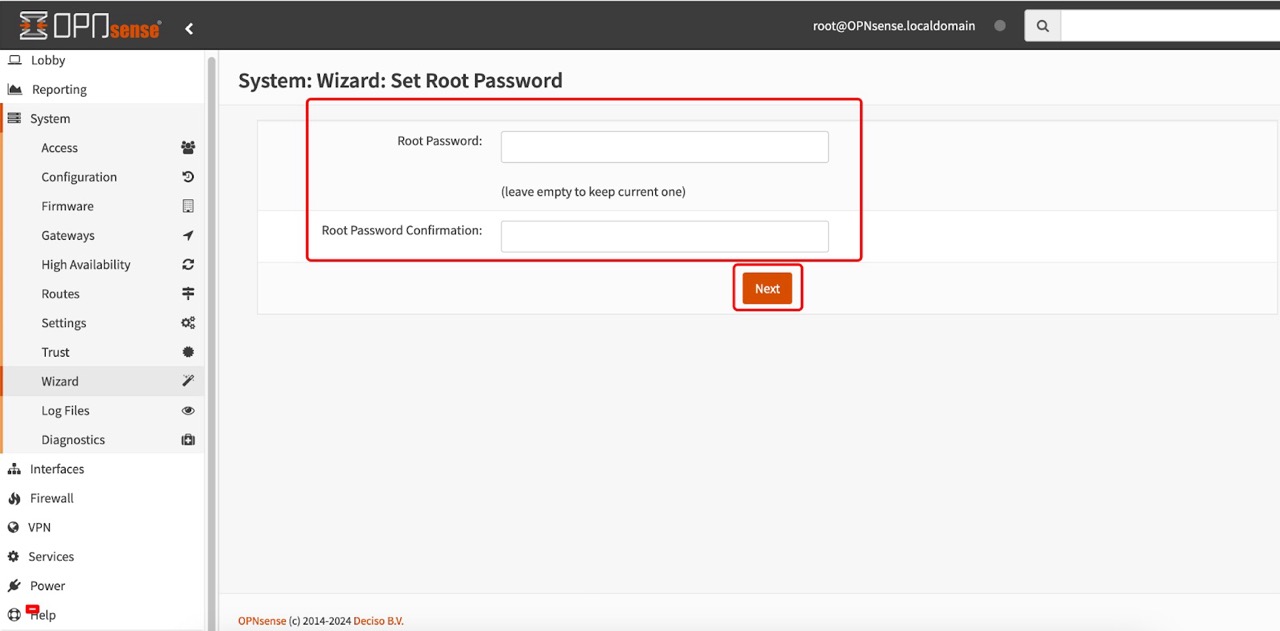
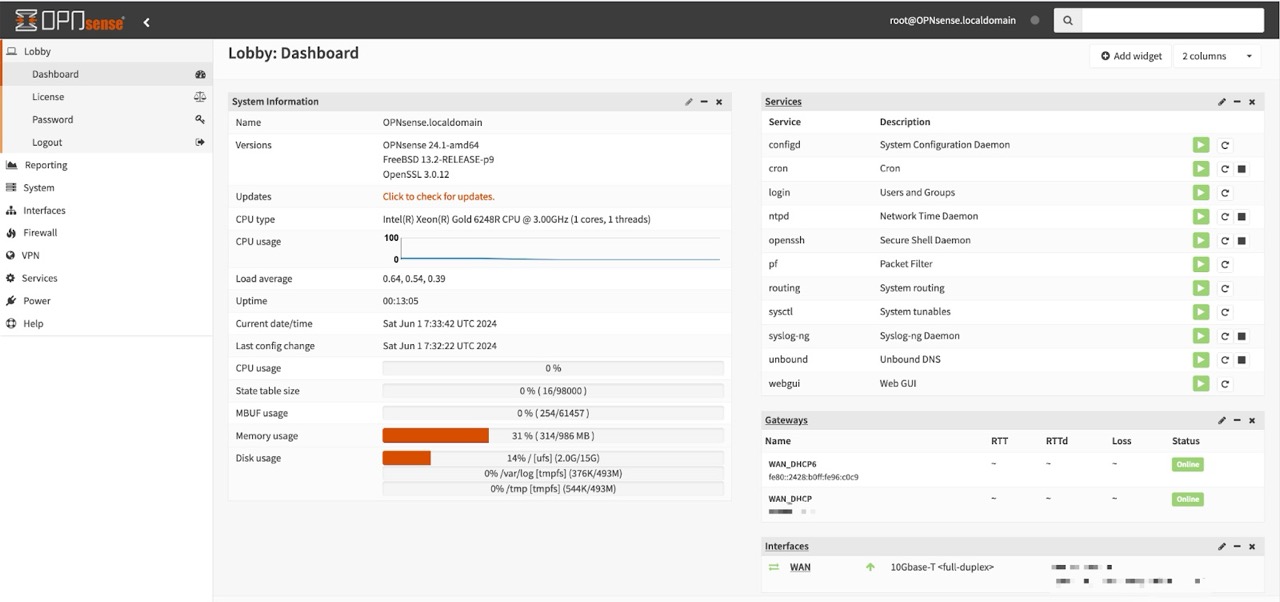
System and network data:
You can change the password for the root user through the web interface:

And add another user if needed:
Step 1

Step 2

Step 3

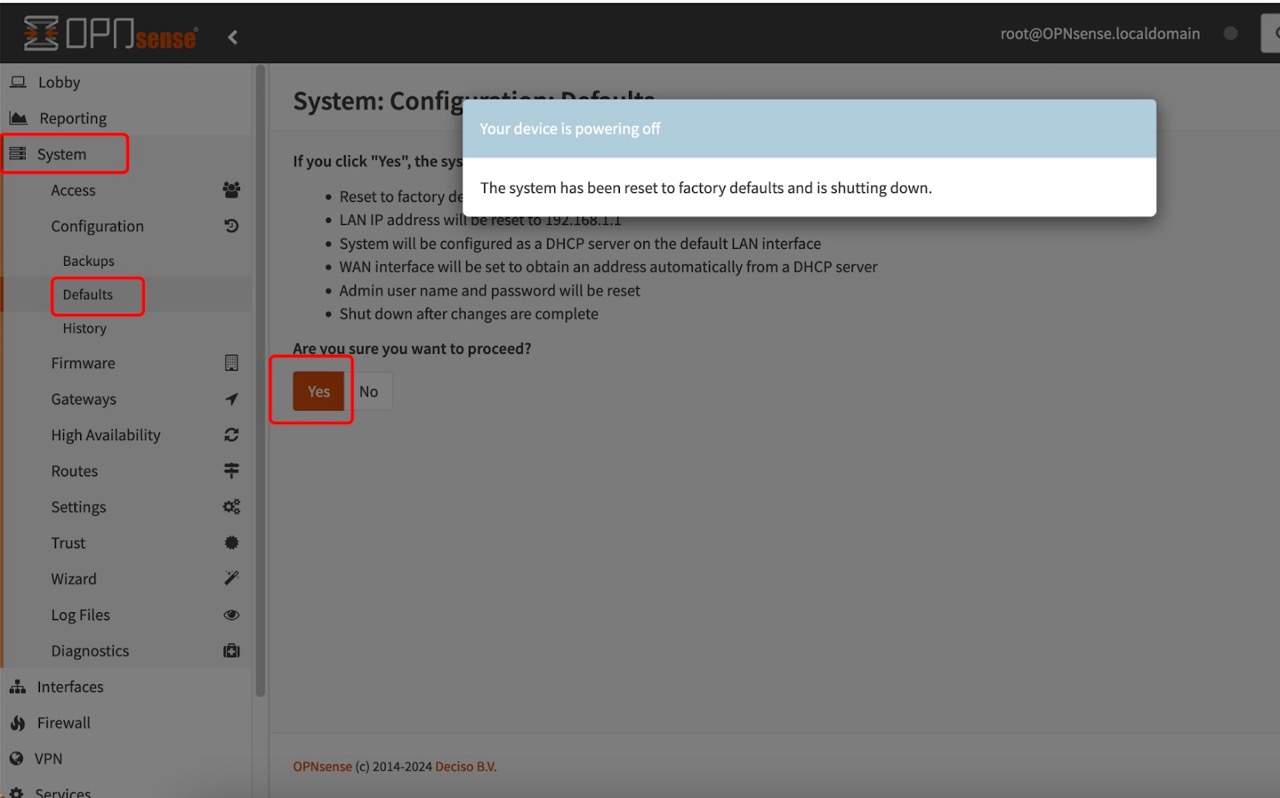
To reset the settings via the web interface, go to the System menu and select Defaults. After resetting the settings, you will need to manually turn on the router.
Proper router configuration is key to a stable and secure network. By following our recommendations and instructions, you will be able to set up all necessary parameters efficiently and effectively. Whether you use the console, SSH, or web interface, managing your router will become clear and simple. Now, you're ready to ensure your network has reliable connectivity and optimal performance.
You can launch a virtual router based on OPNsense in your 3HCloud personal account.


