Cloud VM Conversion for Migration to 3HCloud


The world changes fast. What felt like solid ground for years can turn into friction for business in a matter of months. Yet the same forces often become growth catalysts, pushing companies to reconsider conservative decisions. Cloud computing has been around for more than 20 years, but many organizations continue to rely on on-prem infrastructure and traditional virtualization stacks.
For many, the turning point came with the acquisition of VMware in 2023 by Broadcom. Perpetual licenses were replaced by subscription models, and modular component selection became economically impractical. Instead of selling individual products, the vendor effectively shifted toward bundled platforms. At the same time, the partner ecosystem changed dramatically, reducing the number of available providers and leading to the shutdown of many partner programs.
As a result, organizations faced a difficult choice: look for a new VMware provider or migrate to alternative software and infrastructure solutions. Both options require careful planning and solid expertise. In this article, we aim not just to suggest a migration path, but to provide a practical foundation for moving workloads to the cloud with minimal risk and effort.
The Universal RAW Format
The evolution of virtualization has produced a wide variety of disk formats. Hypervisor vendors designed their image formats to be convenient and feature-rich: thin or thick provisioning, 2 GB splits, snapshot chains, and more. All of them work perfectly well in production. However, most cloud providers require images in RAW format during migration, and this comes with specific implications.
There is a nuance rarely discussed publicly. Many proprietary hypervisor formats are tied not only technically but also legally to a vendor ecosystem. Using VMDK implies dependency on Broadcom (formerly VMware). Using VHDX ties you to Microsoft. RAW, by contrast, is vendor-neutral. It is not governed by a specific proprietary specification and helps avoid legal gray areas.
Technically, RAW is a bit-for-bit copy of a disk with no hypervisor metadata. For cloud environments, this is the simplest and safest import format. It allows the storage backend to apply its own logic and optimizations for maximum efficiency. To understand why, consider what happens during image import.
When you upload a RAW file, it is transparently split into chunks. Each chunk is hashed and distributed across the storage cluster. This process adds resilience and redundancy. Because RAW represents a plain block device, the cloud platform does not need to interpret dozens of format variations or implement vendor-specific features. The cloud becomes the single optimization layer for all clients.
The drawback is size. Modern formats often use compression or sparse allocation to save space and bandwidth. Imagine a VM with a 100 GB virtual disk containing only 25 GB of actual data. A RAW image still represents the full 100 GB logical disk. The cloud must be ready to receive the entire logical size.
Another key challenge is that RAW is rarely used directly in production. It must be generated from the native hypervisor format. This conversion stage is the most complex, as it requires careful handling of snapshots, differencing chains, and format-specific logic. Let’s review the most common formats.
Virtual Machine Disk Formats
QCOW2
QCOW2 is widely used in open-source environments based on QEMU/KVM, such as Proxmox VE. The name stands for “QEMU Copy-On-Write.” The original QCOW format appeared in the early 2000s as a flexible Linux-friendly solution. Its core principle is copy-on-write. Changes are written to new blocks, while original data remains untouched. You can think of it as a virtual filesystem layered on top of a disk image, complete with its own allocation tables.
A base image (backing file) remains unchanged, while overlays store differences. This allows snapshotting, fast cloning, and efficient disk usage. However, the internal block management and snapshot chains make QCOW2 difficult to use outside the QEMU ecosystem. Fortunately, QEMU provides the qemu-img utility, which can convert QCOW2 to RAW while producing a clean final disk state.
Check image information:
$ qemu-img info source.qcow2
Verify integrity:
backing file: basic.qcow2
If the backing file is missing, the conversion will either fail with an error or produce a corrupted RAW image. With large disks, this preliminary check completes significantly faster than the actual conversion process and can warn you about potential problems in advance.
As an additional safeguard, you can run an integrity check:
$ qemu-img check source.qcow2
No errors were found on the image.
686/2048 = 33.50% allocated, 0.00% fragmented, 0.00% compressed clusters
Image end offset: 45285376
Only after verifying that the image chain is intact and no structural errors are detected should you proceed with the conversion.
$ qemu-img convert -p -f qcow2 -O raw source.qcow2 target.raw
As a result, you obtain a ready-to-use target.raw file prepared for upload.
$ qemu-img info target.raw
image: target.raw
file format: raw
virtual size: 128 MiB (134217728 bytes)
disk size: 42 MiB
Child node '/file':
filename: target.raw
protocol type: file
file length: 128 MiB (134217728 bytes)
disk size: 42 MiB
VMDK
Let’s begin with the main complication. VMDK is not a single specific format but an entire family. VMDK files can generally be divided into two categories: static and dynamic. The static (flat) type allocates the full declared size immediately. If you create a 20 GB disk, the *-flat.vmdk file will instantly occupy the entire 20 GB of storage. In practice, this is very close to RAW, but it is accompanied by an additional disk geometry descriptor file.
Dynamic (sparse) VMDK works differently. It stores only the blocks that actually contain written data. Unused logical disk space does not physically exist in the file. This allows you to declare a virtual disk of almost any size while consuming only the amount of storage actually written (plus metadata). This type closely resembles QCOW2, since it relies on the same Copy-On-Write mechanism and effectively builds a virtual allocation structure on top of the image file.
It is also worth mentioning split images. In such cases, there is a single descriptor file, for example disk.vmdk, along with multiple extents of up to 2 GB each. These extents may be named disk-s001.vmdk, disk-s002.vmdk, disk-s003.vmdk, and so on. Each extent contains a sequence of data blocks, while the descriptor defines their order. For the guest operating system, all of this appears as a single unified disk.
The 2 GB split was originally introduced to overcome limitations of older filesystems such as FAT32, where a single file could not exceed 4 GB. Additionally, corruption to one extent did not necessarily mean corruption of the entire image, which helped with recovery after failures. Another subtle benefit was easier network transfer and burning to optical media.
This wide variety of implementations means you either need different conversion tools or must first normalize the image into a single consistent format before producing RAW. The most practical, VMware-style approach is to use the vmkfstools utility (from ESXi), which can convert any VMDK into a form suitable for direct RAW conversion (so-called flat VMDK).
$ vmkfstools -i source.vmdk target-flat.vmdk -d eagerzeroedthick
Destination disk format: VMFS eagerzeroedthick
Cloning disk 'source.vmdk'...
Clone: 100% done.
The key element here is the -d eagerzeroedthick parameter. It instructs the tool to fully allocate the new disk, ensure all blocks physically exist, and eliminate additional features such as sparse allocation, delta files, or snapshots. As a result, you get two files:
- target-flat-flat.vmdk - the most RAW-like image
- target-flat.vmdk - a descriptor file required only by VMware
At this point, it is sufficient to use dd to produce a clean RAW image:
$ dd if=target-flat-flat.vmdk of=disk.raw bs=1M
It is important to note that everything cannot be done in a single command. VMware’s architecture intentionally treats RAW as an “external world” format, and direct interaction with it is deliberately limited.
VHD / VHDX
The early 2000s were a time when corporations aggressively competed for emerging markets, including virtualization. Microsoft did not start from scratch. Instead, it acquired an existing product along with its technology.
Microsoft’s first desktop virtualization product was Virtual PC, originally developed by Connectix Corporation. Connectix specialized in innovative software and hardware products, often selling them after they gained popularity. Virtual PC was designed to run Windows applications inside macOS. It was not a hypervisor in the modern sense but rather an emulator relying on binary translation rather than hardware virtualization.
Along with Virtual PC, Microsoft acquired the VHD storage format. It had a simple structure, lacked strong failure-protection mechanisms, and was designed for desktop use cases. It also inherited limitations of that era, such as a maximum file size of 2 TB. At the time, this limit seemed theoretical rather than practical.
The next logical step was server virtualization and the development of a full hypervisor called Hyper-V. Initially, VHD was considered for reuse, but it quickly became clear that it was insufficient. It scaled poorly, handled large disks with 4K sectors incorrectly, and was not designed for large LUNs or enterprise filesystems. Metadata updates were not journaled, which could lead to allocation table corruption during power failure.
VHDX was created to address these shortcomings. It was a complete redesign of what a server-grade virtual disk format should be. The maximum file size increased to 64 TB. Metadata journaling was introduced, allowing recovery after sudden power loss. Support for 4K sectors was added, along with numerous smaller but critical integrity mechanisms.
VHDX supports three types of virtual disks:
- Fixed VHD - most similar to RAW, fully allocated immediately.
- Dynamic VHD - grows as data is written (and maintains its own metadata).
- Differencing VHD - follows the same principle as QCOW2 (base image plus recorded differences).
To convert a Fixed VHDX, you can use qemu-img:
PS> qemu-img.exe convert -p -f vhdx -O raw disk.vhdx disk.raw
Dynamic disks require an additional step. First, convert them to a flat format using Hyper-V tools, then convert to RAW. For Differencing disks, merge the images:
PS> Merge-VHD -Path .\child.avhdx -DestinationPath .\merged.vhdx
Then proceed as usual:
PS> qemu-img.exe convert -p -f vhdx -O raw merged.vhdx disk.raw
Alternatively, you can use the free StarWind V2V Converter / P2V Converter. It can convert local image files, retrieve images from remote hypervisors, and even capture physical disks into virtual disk images of the required format.
VDI
Many developers and DevOps engineers deploy test instances locally. Two products dominate this space: VMware Workstation Pro and Oracle VM VirtualBox. The latter stores virtual hard disks in VDI format. VDI supports fixed, dynamic, and differencing disks, similar to VHDX. However, while VHDX is proprietary and relatively closed, VDI was developed within the open-source ecosystem with a philosophy of transparency.
VDI was not designed primarily as a hypervisor-native format but rather as a universal transport container. It is rarely used outside the VirtualBox ecosystem. Unfortunately, it lacks built-in protection against block corruption during sudden power loss, which introduces certain risks. Dynamic disks use a fixed 1 MB block size, simplifying management but not always optimal for high I/O performance.
To convert VDI images to RAW, you can use external tools (again, qemu-img) or the built-in VBoxManage utility:
PS> VBoxManage clonemedium disk.vdi disk.raw --format RAW
If the disk is part of a snapshot chain, you must convert the most recent active disk or sequentially delete snapshots:
PS> VBoxManage snapshot "VM_NAME" delete "SNAPSHOT_NAME"
Although this action may seem non-obvious, VirtualBox performs differencing disk merging during snapshot deletion. Repeat the process until the snapshot tree becomes empty.
Pre-flight checklist
✓ Completely power off the virtual machine.
✓ Check for snapshots and image chains.
✓ Verify available storage space.
✓ Estimate conversion time.
✓ Validate the integrity of the resulting file.
✓ Perform a local test boot in a hypervisor.
Uploading Your Image
Once the conversion process is complete, you can upload the resulting image to 3HCloud storage. The procedure is straightforward. Open the Cloud - My Images - Create. Enter the image name and select the appropriate RAW file.
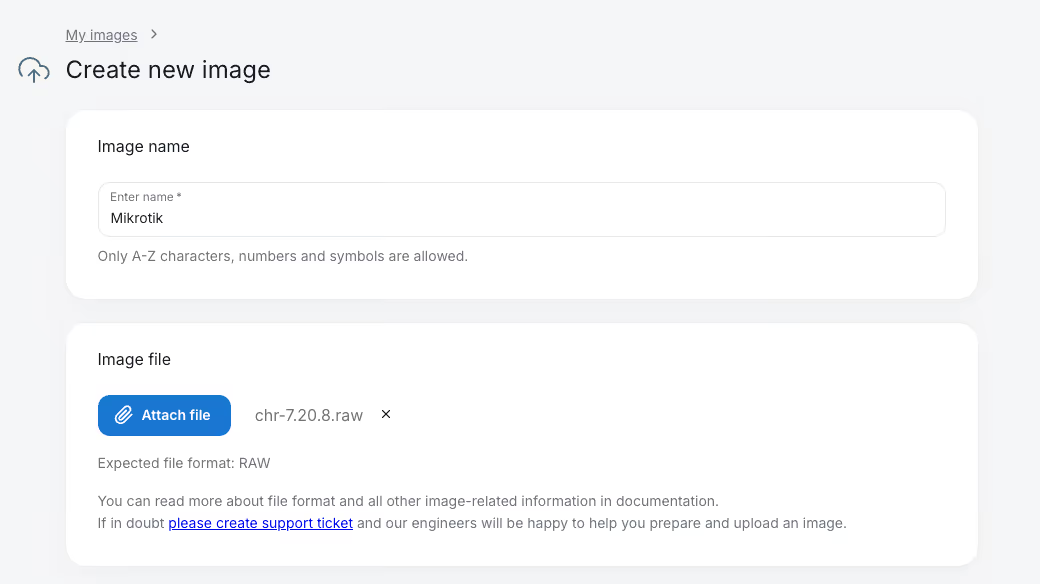
Perform a local test boot in a hypervisor.
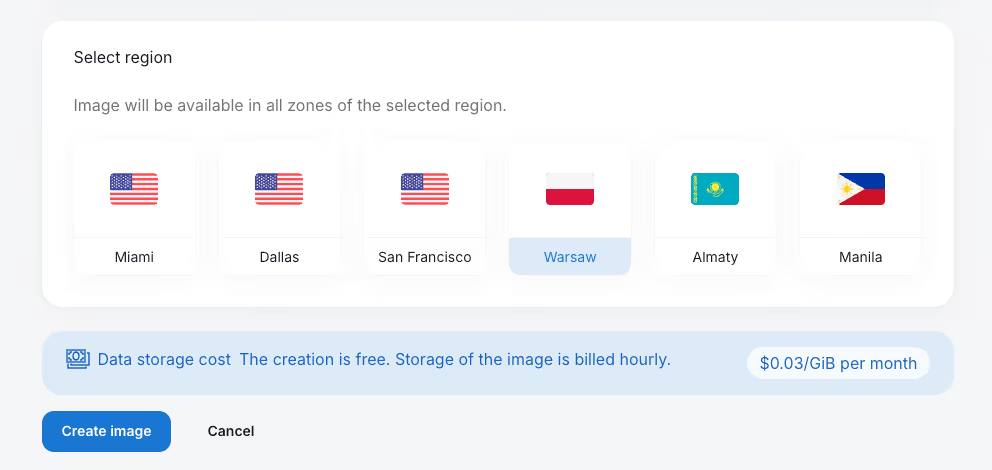
Next, choose the country where the image will reside. In most scenarios, this should match the region where you plan to deploy.
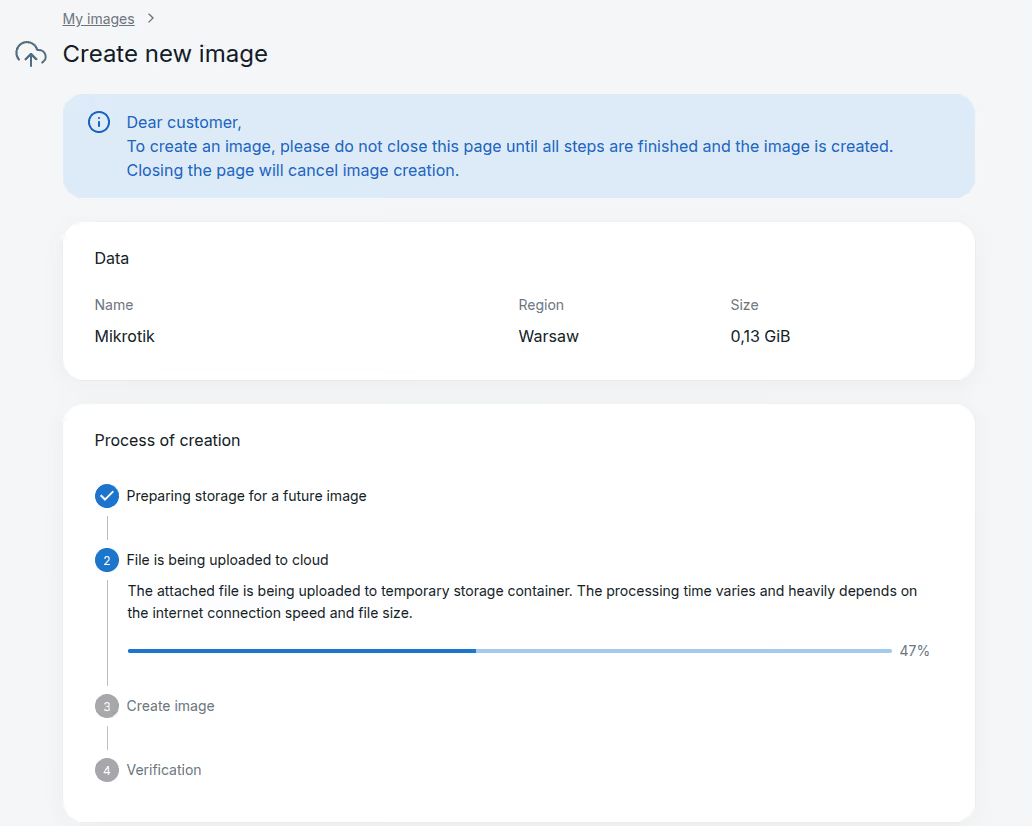
After clicking Create image, a page will display the upload progress to cloud storage. Do not close this page until the process completes.
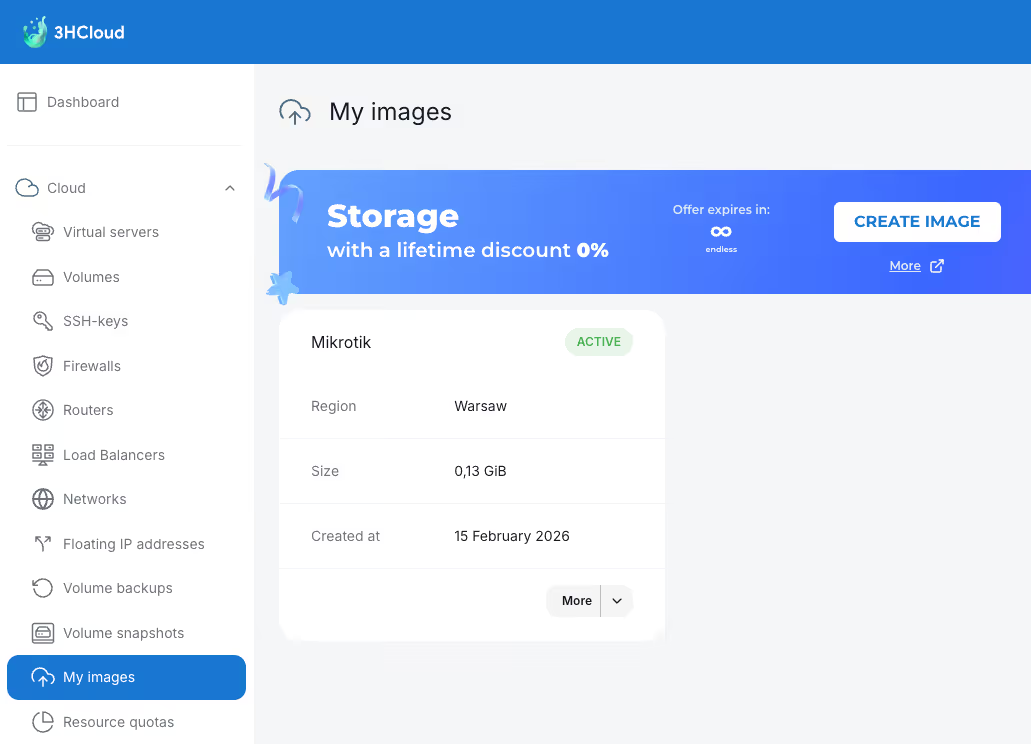
Once the image has been uploaded and verified (ensuring no bytes were lost during transfer), it will appear in the My Images list and be ready for use. You can now create a virtual machine from it.
Conclusion
Migrating workloads to the cloud may seem complex. However, by following these recommendations, you can properly convert disk images and move them directly into the 3HCloud infrastructure.
This approach ensures full independence in terms of operating systems and maintains your desired level of data privacy. In this model, the cloud acts as an execution environment for your applications and services, eliminating the need to manage physical infrastructure.
Upload your disk images and, within minutes, receive fully operational virtual machines that can scale easily, providing computing resources exactly when your business needs them most.