
Deploying and Basic Configuration of ComfyUI


When working with self-hosted neural networks for tasks like image generation, most users prefer simple solutions, such as Stable Diffusion WebUI. The interaction there revolves around entering positive and negative prompts and selecting additional parameters. It’s fast and convenient, but it doesn’t provide full control or understanding of all stages of the actual generation process.
In this article, we’ll look at another interface called ComfyUI. Although significantly more complex, it offers a much deeper level of control. If you manage to understand the general logic behind how this system works, you will be able to build a pipeline for generating virtually any type of content, from pictures of cats to music tracks.
"Before diving in, make sure the machine you're running this on actually has the GPU headroom ComfyUI needs."
See our guide on choosing a GPU for AI workloads →
Installation
Via the Application
The easiest way to install ComfyUI is by using the standalone Comfy Desktop application with a graphical interface. Available for Windows, Linux, and macOS, it automatically prepares an isolated virtual environment and installs Python, the PyTorch framework, and other required components. It also supports multiple independent installations, which can be very useful when using custom nodes. However, there is less manual control here than with a standard installation from the Git repository.
Another fairly simple option is the portable version. The entire process comes down to downloading an archive, extracting it, and launching a .bat file. These builds are official and available for NVIDIA, AMD, and Intel. The good thing is that they are easy to launch, move, and back up. However the environment can become cluttered with conflicting dependencies over time.
From the Repository
Now let’s move on to a more flexible (albeit more complex) installation method: via Git. First, clone the repository:
git clone https://github.com/Comfy-Org/ComfyUI.git
Go to the newly created directory:
cd ComfyUI
If venv is not installed on the system, install this package separately:
sudo apt install python3.12-venv
Create an isolated virtual environment:
python3 -m venv comfyui
Activate it:
source ~/ComfyUI/comfyui/bin/activate
Now install all required dependencies from the requirements.txt file:
pip install -r requirements.txt
And launch the application:
python main.py
Overall, this is one of the most reliable ways to install ComfyUI, although you will have to keep a close eye on dependencies.
Via comfy-cli
This is a convenient middle-ground option for cases where you want to automate the installation but don’t want to deal with all the details. Before starting, create a virtual environment, just like in the previous step, and then install comfy-cli using the standard package management system:
pip install comfy-cli
After the installation is complete, run the installation script:
comfy install
The system will ask just one question about which GPU you’re using. After that, it will install all the required dependencies and ComfyUI itself, alongside the Manager.
Via Docker
Installing ComfyUI as a container is also possible, although this requires a few additional steps. The concept of running applications inside containers implies isolation, including from physical devices. However, ComfyUI will require a GPU for computations anyway, so it will need to be passed through into the containerized environment. NVIDIA Container Toolkit will help with this.
Download NVIDIA's public GPG key:
curl -fsSL https://nvidia.github.io/libnvidia-container/gpgkey \
  -o /tmp/nvidia-container-toolkit.gpgkey
Convert it into the keyring format used by the APT package manager:
sudo gpg --dearmor \
  -o /usr/share/keyrings/nvidia-container-toolkit-keyring.gpg \
  /tmp/nvidia-container-toolkit.gpgkey
Download the NVIDIA Container Toolkit repository definition:
curl -sL https://nvidia.github.io/libnvidia-container/stable/deb/nvidia-container-toolkit.list \
  -o /tmp/nvidia-container-toolkit.list
Add the GPG key reference to the repository:
sed 's#deb https\://#deb [signed-by=/usr/share/keyrings/nvidia-container-toolkit-keyring.gpg] https\://#g' \ /tmp/nvidia-container-toolkit.list \ | sudo tee /etc/apt/sources.list.d/nvidia-container-toolkit.list
Update the package lists and install it:
sudo apt update && sudo apt install -y nvidia-container-toolkit
Restart the Docker daemon to activate the newly added toolkit:
sudo systemctl restart docker
The project doesn’t provide official images, so we will build our own.
First, create a separate directory:
mkdir -p ~/comfyui-docker
Go there:
cd ~/comfyui-docker
Create a file describing the future container:
nano Dockerfile
The lightweight python:3.13-slim image is used as the base here, followed by these steps:
- updating packages
- cloning the ComfyUI repository
- installing CUDA 13.0
- installing the required dependencies
- launching ComfyUI with port 8188 exposed externally
FROM python:3.13-slim

ENV DEBIAN_FRONTEND=noninteractive
ENV PIP_NO_CACHE_DIR=1
ENV PYTHONUNBUFFERED=1

RUN apt-get update && apt-get install -y \
    git \
    ffmpeg \
    libgl1 \
    libglib2.0-0 \
    && rm -rf /var/lib/apt/lists/*

WORKDIR /opt

RUN git clone https://github.com/Comfy-Org/ComfyUI.git

WORKDIR /opt/ComfyUI

RUN python -m pip install --upgrade pip setuptools wheel

# NVIDIA / CUDA 13.0
RUN pip install \
    torch torchvision torchaudio \
    --extra-index-url https://download.pytorch.org/whl/cu130

RUN pip install -r requirements.txt

EXPOSE 8188

CMD ["python", "main.py", "--listen", "0.0.0.0", "--port", "8188"]
Check the CUDA version:
docker run --rm \
  --gpus all \
  comfyui-official:latest \
  python -c "import torch; print(torch.__version__); print(torch.version.cuda); print(torch.cuda.is_available()); print(torch.cuda.get_device_name(0))"
You should get an output similar to this:
2.13.0+cu130
13.0
True
Now launch it while simultaneously mounting the directories containing models, input and output data, and custom nodes. This will make it easy to modify the standard feature set later:
docker run -d \
  --name comfyui-new \
  --gpus all \
  -p 8188:8188 \
  -v $HOME/comfyui/Packages/models:/opt/ComfyUI/models \
  -v $HOME/comfyui-data/input:/opt/ComfyUI/input \
  -v $HOME/comfyui-data/output:/opt/ComfyUI/output \
  -v $HOME/comfyui-data/user:/opt/ComfyUI/user \
  -v $HOME/comfyui-data/custom_nodes:/opt/ComfyUI/custom_nodes \
  --restart always \
  comfyui-official:latest
Open the following address in your browser: http://[IP-ADDRESS]:8188/

Image Generation Example
First, we need a model. The easiest option is to start with Stable Diffusion XL 1.0. While the container is running, the contents of ~/models are mounted inside /opt/ComfyUI/models, so you can simply copy the downloaded model there and immediately have it available inside the container.
Create a directory:
mkdir ~/models/checkpoints
Go there:
cd ~/models/checkpoints
And download the model weights:
curl -L \
"https://huggingface.co/stabilityai/stable-diffusion-xl-base-1.0/resolve/main/sd_xl_base_1.0.safetensors?download=true" \
-o sd_xl_base_1.0.safetensors
The logic behind ComfyUI is that every action has its own corresponding node. And in order for the required model name to appear in the list of available models inside each node, you need to perform a couple of additional actions.
Select Models, click Refresh. The model will then appear in the list of available models:
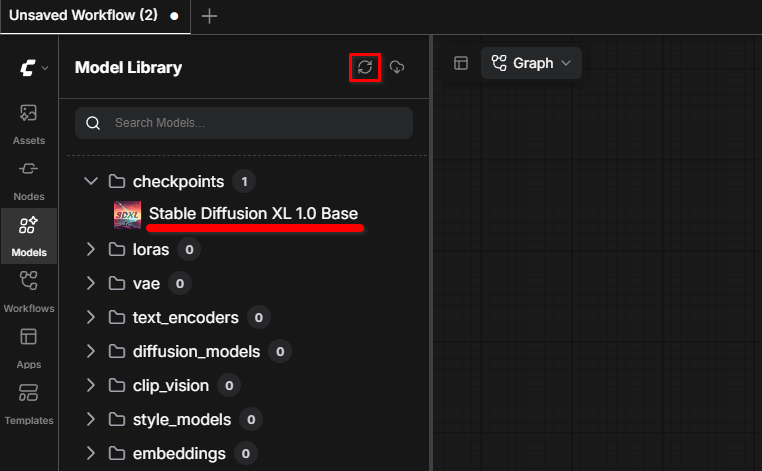
If that doesn’t work, click the Load All Folders icon on the right. Now add the first node:
Add Node - model - loaders - Load Checkpoint
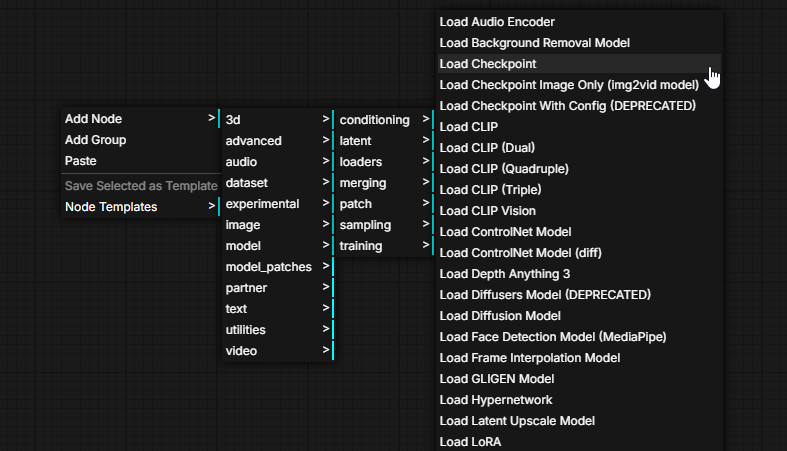
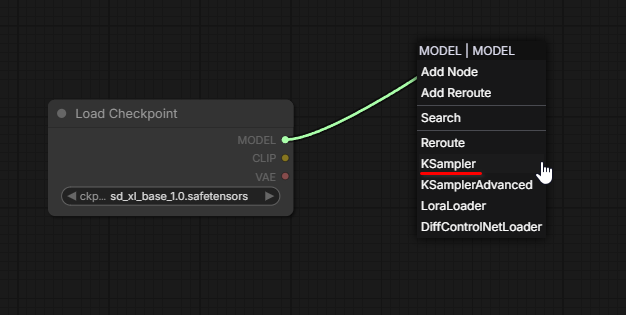
Click the Model dot and drag the connection to the side, then select KSampler:
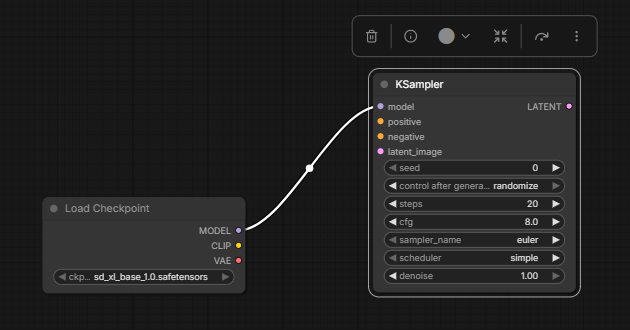
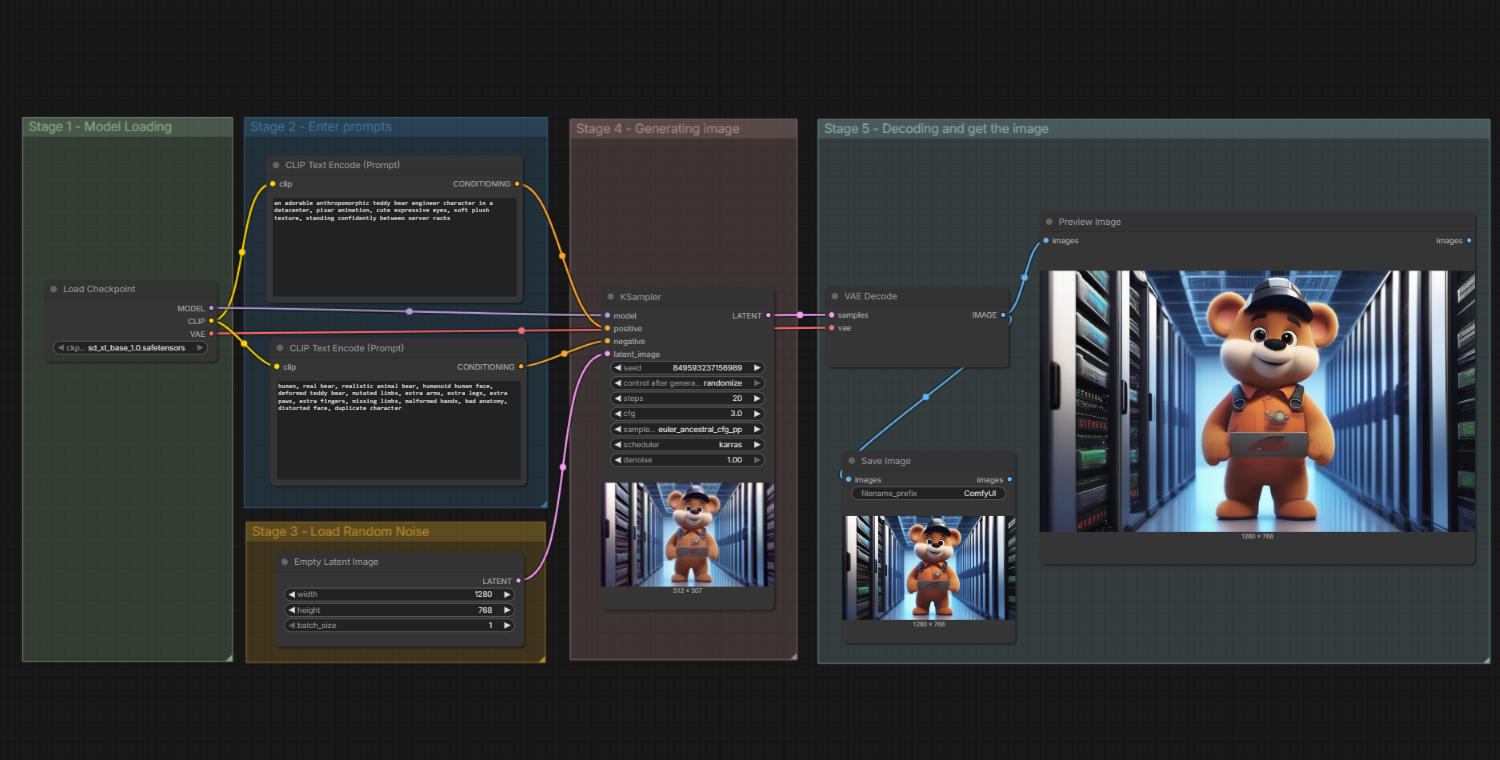
This node controls parameters, such as the number of generation steps, prompt adherence strength, sampler type, and scheduler. It needs to receive the model, positive and negative prompts, as well as latent_image as inputs:
Prompts are supplied from the CLIP output. Add two CLIP Text Encode nodes from it. The upper one will provide the positive prompt, while the lower one will provide the oneprompt. Connect the corresponding CONDITIONING outputs to positive/negative. For convenience, the nodes belonging to each logical step can be combined into groups and labeled:
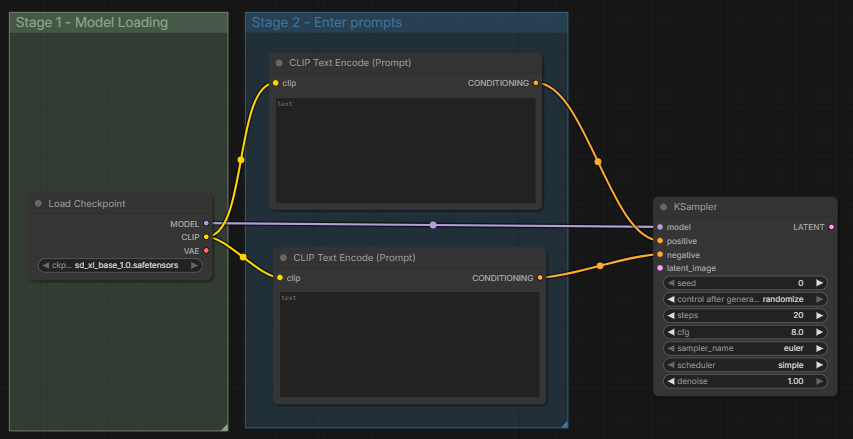
During generation, the neural network operates in latent space. To simplify things considerably, it has to work with abstract numbers and noise instead of pixels. For now, think of latent space as a semi-finished product: you can turn any image into it and extract the image back from it.
If you want to start generating from scratch, you need to feed an empty latent space into the sampler, which is an image of a specified resolution containing random noise. Drag a connection from the latent_image point to any empty area and select the Empty Latent Image node:
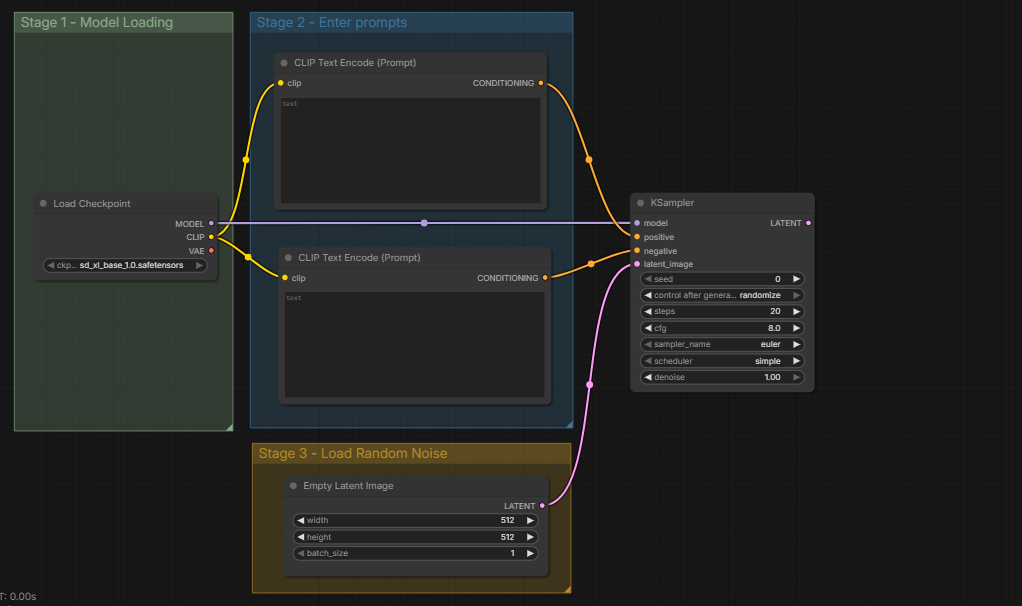
Now KSampler has all the necessary input data. This is the node that will trigger iterative image generation by removing noise from the specified latent space step by step while taking the entered prompts into account. Once generation is complete, the image will be ready, except that, for now, it will still remain a semi-finished product in its latent representation.
In order to turn it back into an image, we need another node that will handle this task. Drag a connection from the LATENT point and select the VAE Decode node. VAE (Variational Autoencoder) is a small neural network that can either come from the “parent model” or be loaded separately.
The model has the Checkpoint type, which means it already contains the required VAE. Therefore, drag a connection from the Load Checkpoint node to the VAE Decode node:
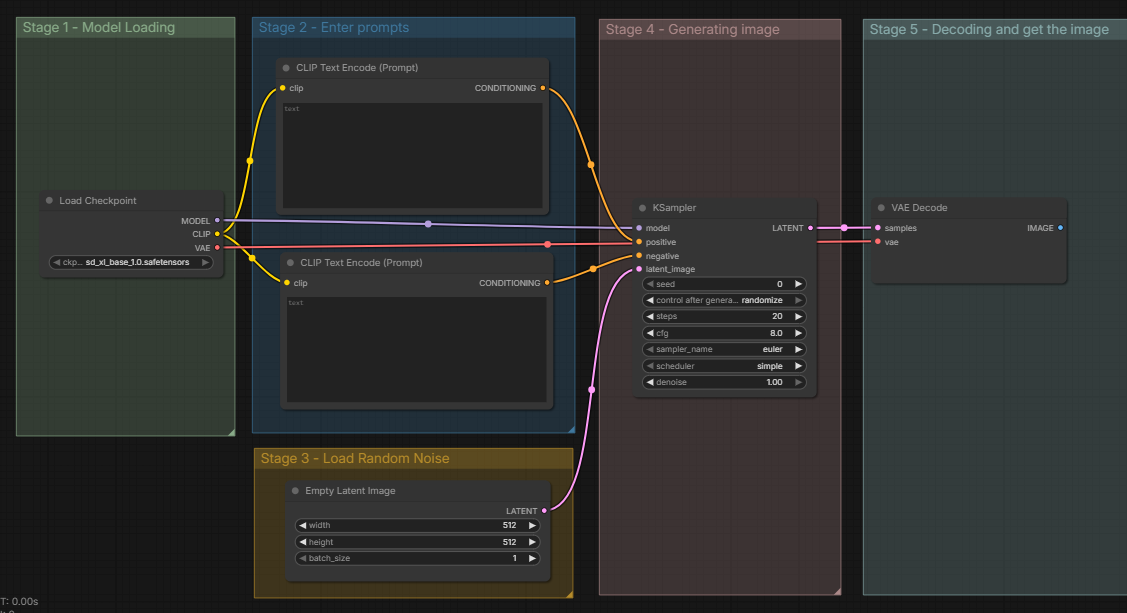
All that remains is to output the image. The most convenient option is to create two outputs at once: one will display the generated image right here, while the other will save the image in PNG format. Add two nodes, Preview Image and Save Image, from the IMAGE point.
The completed workflow will look as follows:
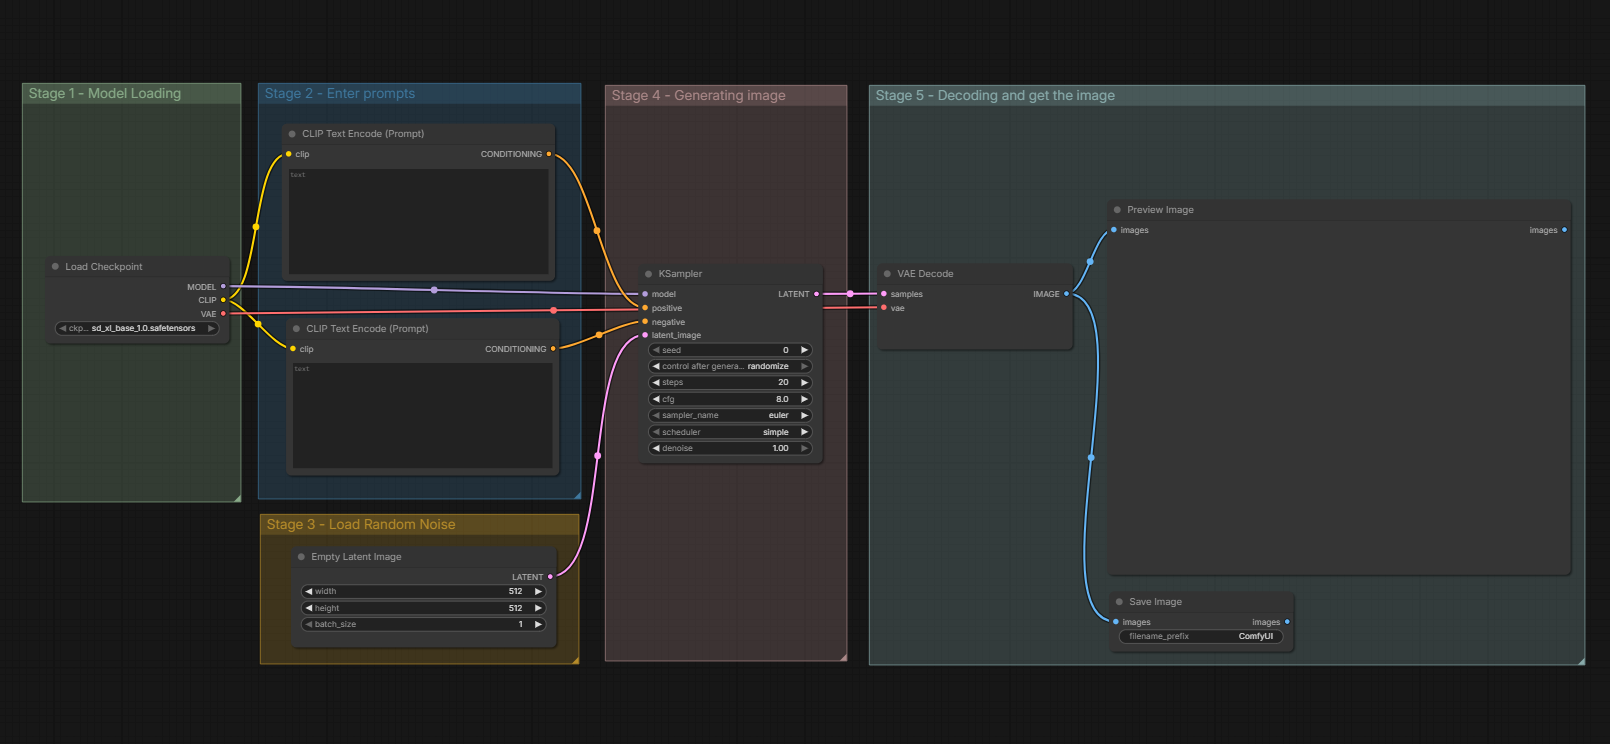
Enter prompts and parameters, and generate your first image by clicking the Run button:
Conclusion
In this article, we’ve covered only the simplest way to generate images using ComfyUI. If you try to build such a workflow yourself, you will gain a better understanding of the principles behind generative neural networks. Over time, you’ll be able to build huge multi-stage pipelines for generating and processing content.
ComfyUI is a universal tool. You can generate not only images but also videos and music, even build 3D models from 2D images. Examples of corresponding workflows can be found in the main menu under Templates. The system itself will tell you which models need to be downloaded and which directories they should be placed in so that the selected scenario works without a hitch.
FAQ
Can you run ComfyUI on a remote server without a local GPU?
Yes. ComfyUI runs headless on a Linux server and serves its interface over HTTP, you can control it from any machine with a browser. Start it with --listen 0.0.0.0 --port 8188 to accept connections from outside the host, then reach it at http://[SERVER-IP]:8188/. Generation happens entirely on the server's GPU, so a laptop with integrated graphics is fine as a client. Do not expose port 8188 openly without reading the security question below.
How much VRAM does ComfyUI need for SDXL?
Around 8 GB of VRAM is enough to run Stable Diffusion XL 1.0 comfortably at 1024x1024. Cards with 6 GB usually work with the --lowvram flag, but at the cost of speed, and --novram or --cpu will run on very limited hardware, but generation times go from seconds to many minutes. Video, upscaling, and multi-model pipelines climb quickly from there, with 16 GB or more being a practical starting point. Budget for disk space separately: the SDXL base checkpoint alone is roughly 6.9 GB.
For a deeper breakdown of VRAM, bandwidth, and compute trade-offs across different generation workloads, see our full GPU selection guide.
Which PyTorch CUDA build should I install for my GPU?
It depends on your GPU's architecture, and picking the wrong PyTorch CUDA build is a common cause of ComfyUI failing after an apparently clean install. CUDA 13.0 removed support for Maxwell, Pascal, and Volta, meaning anything older than Turing. If you are running a Tesla V100 (Volta), a GTX 10-series (Pascal), or older, install a CUDA 12.x build such as cu126. Turing (RTX 20-series, T4) and newer, including Ampere, Ada, Hopper, and Blackwell, can use cu130. The symptom of a mismatch is torch.cuda.is_available() returning True while generation fails with a no-kernel-image error. Check the current wheel index at pytorch.org before pinning, since available builds change between releases.
Is it safe to expose ComfyUI to the internet?
No. ComfyUI ships with no authentication, and custom nodes execute arbitrary Python on the host, so anyone who can access an open port 8188 can potentially execute code remotely. Safe options, in rough order of preference, include binding to localhost and reaching it through an SSH tunnel (ssh -L 8188:localhost:8188 user@server), putting it behind a reverse proxy with HTTP authentication and TLS, or restricting port 8188 to your own IP with a firewall rule. Use one of these before you load your first custom node.
If you're running ComfyUI on a cloud instance, don't rely on SSH tunneling alone long-term — a proper firewall in front of the port is the safer default."
Why doesn't my downloaded model appear in the node list?
ComfyUI reads model directories at startup, so a file added afterward won’t be visible. Open the Models panel in the sidebar and click Refresh. Then, if the model still won’t appear, click Load All Folders. If both fail, the file is almost certainly in the wrong place: checkpoints belong in models/checkpoints, LoRAs in models/loras, and VAEs in models/vae. When running in Docker, confirm the host directory you downloaded into is the same one bound by your -v mount, since a mismatch there is the usual culprit.


